
For my tips on Tuesday, I thought I would share a few on painting furniture. I have painted and repurposed furniture, almost my entire life. As a child, we would "pick" while rummaging all kinds of pieces "in the rough." Some, my mom would repaint and others she would take up north to my grandpa to refinish. Truthfully, I just assumed everyone did this!
1. Have the good sense to know when to paint a piece and when NOT to! I have to say, in this painting of furniture craze...it pains me to see some of these natural beauties painted. Often times, when you understand the wood and the time frame these pieces were from, painting them is just wrong. Not only does it lessen their value, most times they turn out "ugly." Now, I say that as one who paints furniture. But, I also know antiques. Research your piece, before you paint it.
2. Prep, prep, sand, sand, wash, wash ..... get the picture? You will never regret the time put into prep and cleaning of a piece before you paint it! You will, however, regret when a greasy stain, chippy corner or even a bubbly veneer comes through your painted piece. Fix it before you paint it.
3. I do not follow trends in paint. I am a classic acrylic painter. I have used both milk and chalk paint, I just don't like the finish. I'm an old dog...I don't want to learn new tricks...but, that doesn't mean my pieces look dated. I do keep up with color trends. One time I did a piece and the shopkeeper told me that the buyer's said..."it's as smooth as silk" and that piece was. Pick your poison and master it!
4. Always complete a piece. Paint the back, underneath, back of feet, turn the piece every which way and look at it...is every area covered. It is a pet peeve of mine, when I see a beautiful painted piece and then I look at the back, the legs, even the back of legs....no paint. If you are going to paint it - then paint it.
5. Find the right product for finishing. When a customer spends $300 on a painted buffet, they want to be able to use it without leaving rings or scratches. Stain, poly or some other kind of finishing of your choice, but this step is crucial.
Here are a few pieces I've done in the past:

 I love to paint in layers and add the aged patina


This was an example of knowing when NOT to repaint a piece. I took off the old linoleum and cleaned it up. Primitive pieces rarely, actually, I'm going to say NEVER need painting. This took cleaning, sanding, sanding, oil and wax...repeat....it was work! It sold at a show to another antique dealer in minutes of my putting it out....it probably was too cheap...


Here are 2 examples of pieces that were already painted, probably years before, but I just took the sander to them and "knocked them down" - truthfully, it was part of the prep stage, but they looked so good that way, I didn't want to paint them. Sometimes this will happen.
6. If the piece is talking to you .... listen.


I will end with this one, probably one of my favorites. I had an old can of paint I bought off the clearance rack. It was an odd color. My intentions were to use it as a primer and first layer of color. Once distressed, it left this piece so soft and warm...you wouldn't know to look at it, but this has 6 or 7 different layers of "product" on it. This was the "smooth as silk" piece I early mentioned.
Good luck and I hope these tips help you for your next project.
Blessings from Ringle, Wisconsin.
1. Have the good sense to know when to paint a piece and when NOT to! I have to say, in this painting of furniture craze...it pains me to see some of these natural beauties painted. Often times, when you understand the wood and the time frame these pieces were from, painting them is just wrong. Not only does it lessen their value, most times they turn out "ugly." Now, I say that as one who paints furniture. But, I also know antiques. Research your piece, before you paint it.
2. Prep, prep, sand, sand, wash, wash ..... get the picture? You will never regret the time put into prep and cleaning of a piece before you paint it! You will, however, regret when a greasy stain, chippy corner or even a bubbly veneer comes through your painted piece. Fix it before you paint it.
3. I do not follow trends in paint. I am a classic acrylic painter. I have used both milk and chalk paint, I just don't like the finish. I'm an old dog...I don't want to learn new tricks...but, that doesn't mean my pieces look dated. I do keep up with color trends. One time I did a piece and the shopkeeper told me that the buyer's said..."it's as smooth as silk" and that piece was. Pick your poison and master it!
4. Always complete a piece. Paint the back, underneath, back of feet, turn the piece every which way and look at it...is every area covered. It is a pet peeve of mine, when I see a beautiful painted piece and then I look at the back, the legs, even the back of legs....no paint. If you are going to paint it - then paint it.
5. Find the right product for finishing. When a customer spends $300 on a painted buffet, they want to be able to use it without leaving rings or scratches. Stain, poly or some other kind of finishing of your choice, but this step is crucial.
Here are a few pieces I've done in the past:

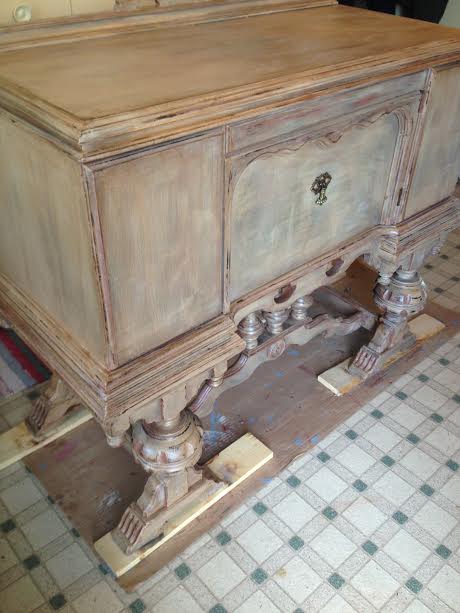


I also like to heavily distress using masking tape to pull off to achieve this antique aged look.


This was an example of knowing when NOT to repaint a piece. I took off the old linoleum and cleaned it up. Primitive pieces rarely, actually, I'm going to say NEVER need painting. This took cleaning, sanding, sanding, oil and wax...repeat....it was work! It sold at a show to another antique dealer in minutes of my putting it out....it probably was too cheap...


Here are 2 examples of pieces that were already painted, probably years before, but I just took the sander to them and "knocked them down" - truthfully, it was part of the prep stage, but they looked so good that way, I didn't want to paint them. Sometimes this will happen.
6. If the piece is talking to you .... listen.


I will end with this one, probably one of my favorites. I had an old can of paint I bought off the clearance rack. It was an odd color. My intentions were to use it as a primer and first layer of color. Once distressed, it left this piece so soft and warm...you wouldn't know to look at it, but this has 6 or 7 different layers of "product" on it. This was the "smooth as silk" piece I early mentioned.
Good luck and I hope these tips help you for your next project.
Blessings from Ringle, Wisconsin.
I am impressed. You are very talented.
ReplyDeleteI hate painting even though you make it look easy. I leave it up to Bob. He does the sanding and painting. I am more of the design gal. I like to create the vignettes. Your pieces look WONDERFUL! Janice
ReplyDeleteYou are indeed one talented lady. Thanks for the tips.
ReplyDeleteBeautiful pieces. You have far more patience than me. I get distracted too easily.
ReplyDeleteKudos to you...and your hard work...cuz that what re-doing a finish on a piece is. I usually throw the towel in a the first “prep” of your equation above LOL (To be fair, I have very little strength in my hands/arms as a result of medical “issues,” so it really is a challenge for me). But even little horn books and such that start out as blank canvases for my punched and stitched pieces are time-consuming to do the right when you’re distressing, etc. So, gee...now I know who to call LOL. ;-). Seriously, you do beautiful work.... Smiles & Hugs ~ Robin
ReplyDelete